What is Dify and Why depoly it locally
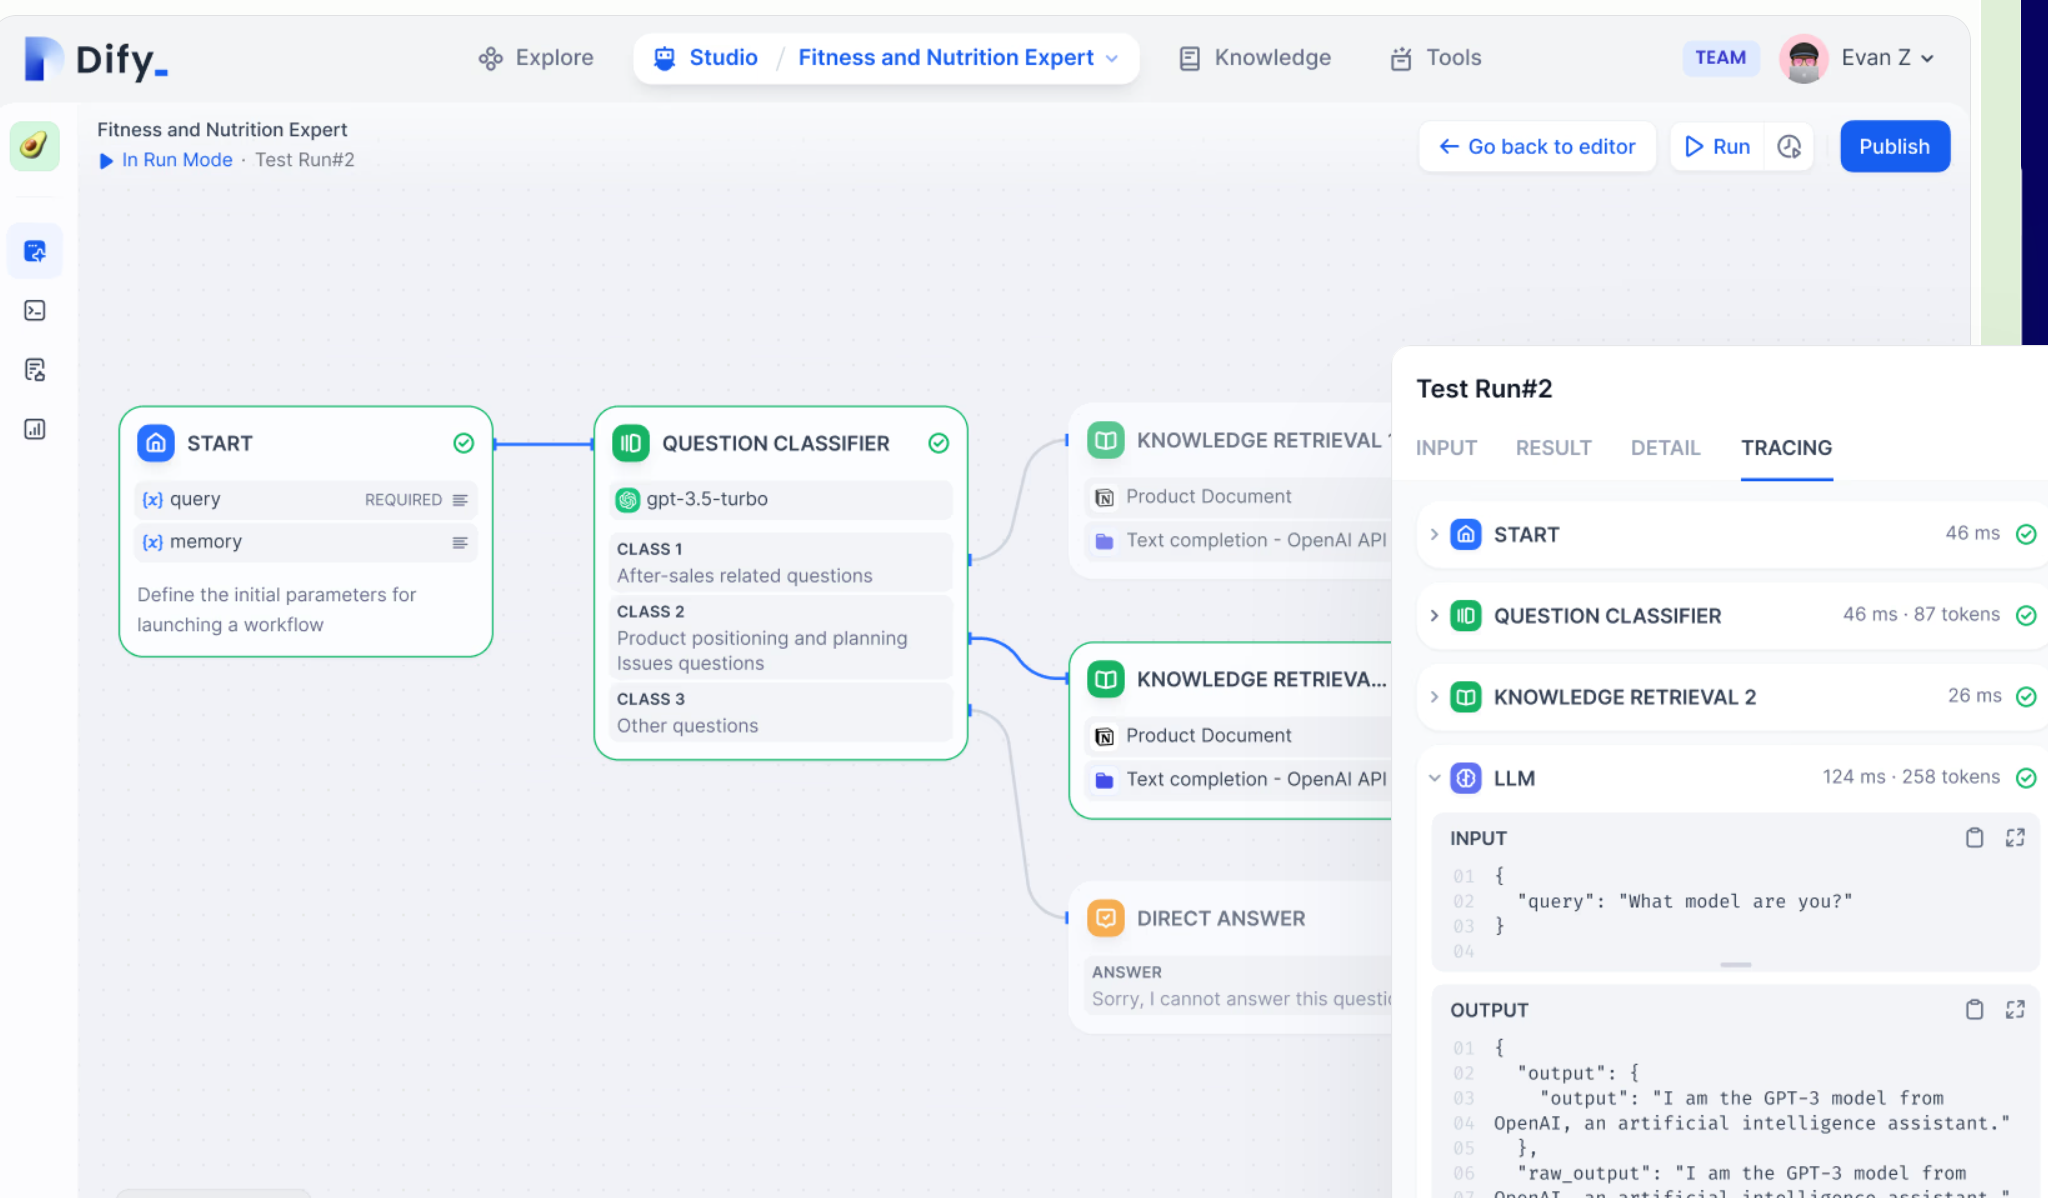
Dify is a low code tool that's allow you to create workflow with LLM nodes. Which means you can design and arrange a dataflow to deal with complex NLP tasks or automated NLP task in minutes without coding.
Although it provides cloud version and you can use most core features for free at anywhere, but you suffer from unstable respond time and , most importantly, data security concern.
Since Dify will connect your LLM API in its backend server and process all data you sent or get, it is a better idea to deploy it yourself and all data will be saved locally. In this post I will show you a full step-by-step guide to install it locally, take Windows + WSL as example.
0x00 Before start, make your plan
Before any action, let's review what need to be in your machine to deploy a Dify with its source codes. Dify provides 2 ways of local deployment:
- All-in-docker-compose : Frontend, backend and middleware(DB, sandbox, etc.) will be composed in to a single docker compose file.
- From source code: You deploy a development environment for your frontend, backend, while everything else in a smaller docker compose.
I personally recommend last choice, because:
- You can get latest update in no time: In this mode, any Dify code commit in Github can be pulled into your code workspace. If you use all-in-docker, you have to wait for image update.
- You can modify your frontend or backend more easily by simply editing the codes.
- A little effort is required compared with all-in-docker mode (to install python environment and node environment.)
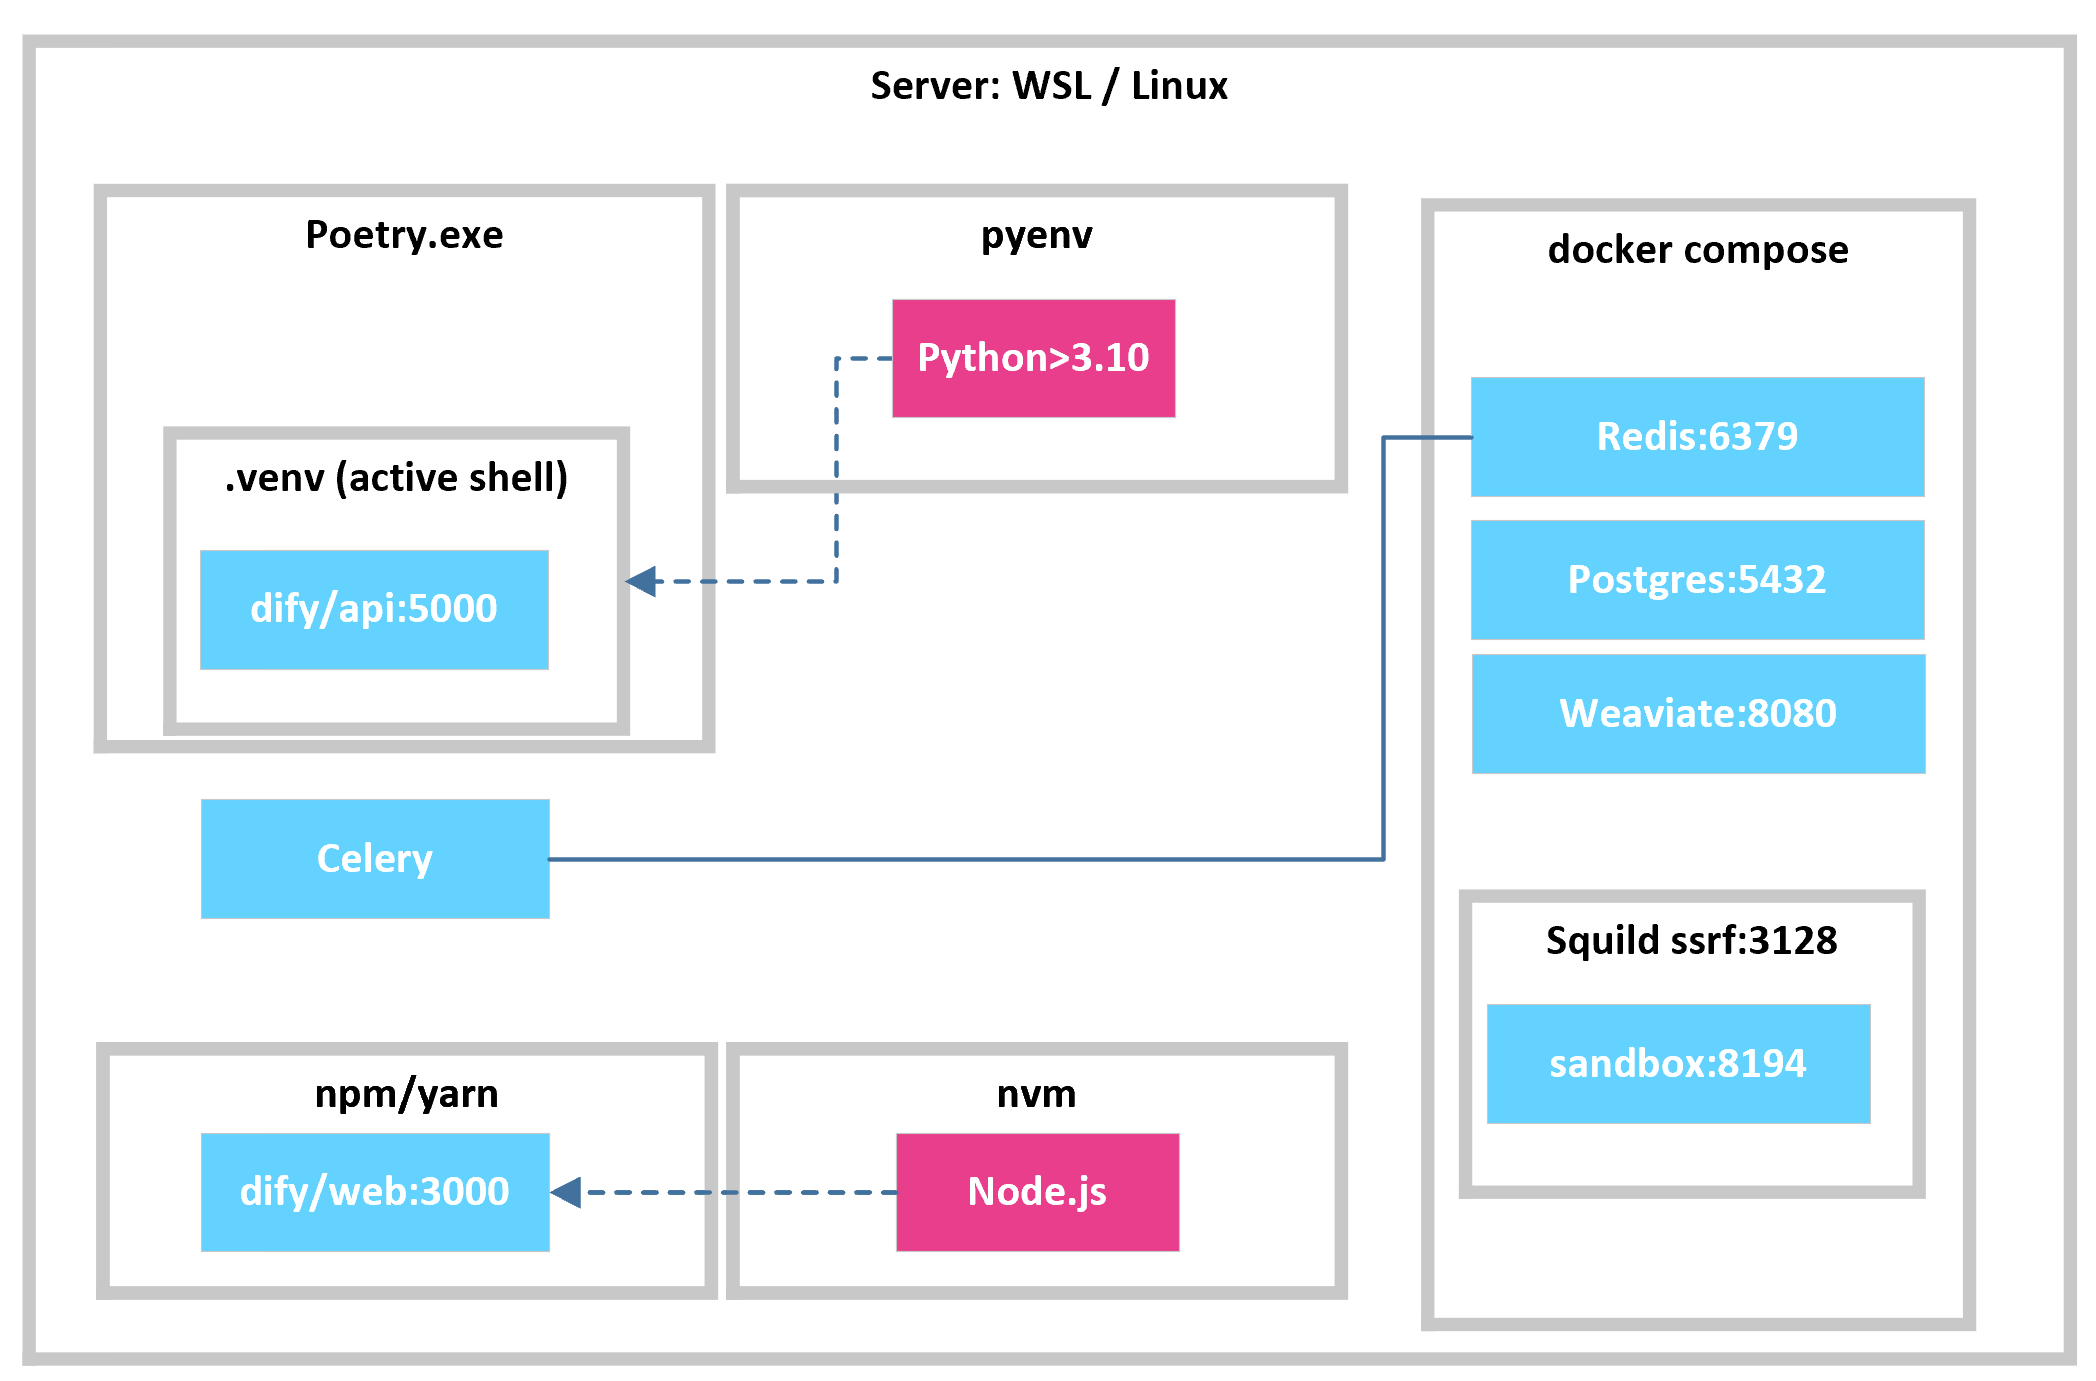
And here is a diagram for all services with its default ports in your local Dify as a full picture, you may not be able to understand every components' name, but we will introduce them with installation instruction.
0x01 All you need to do
Notes: all the commands below run in a Linux distro, if you are using windows, please install WSL (Windows Subsystem Linux) , open PowerShell and enter
bashto jump to WSL.
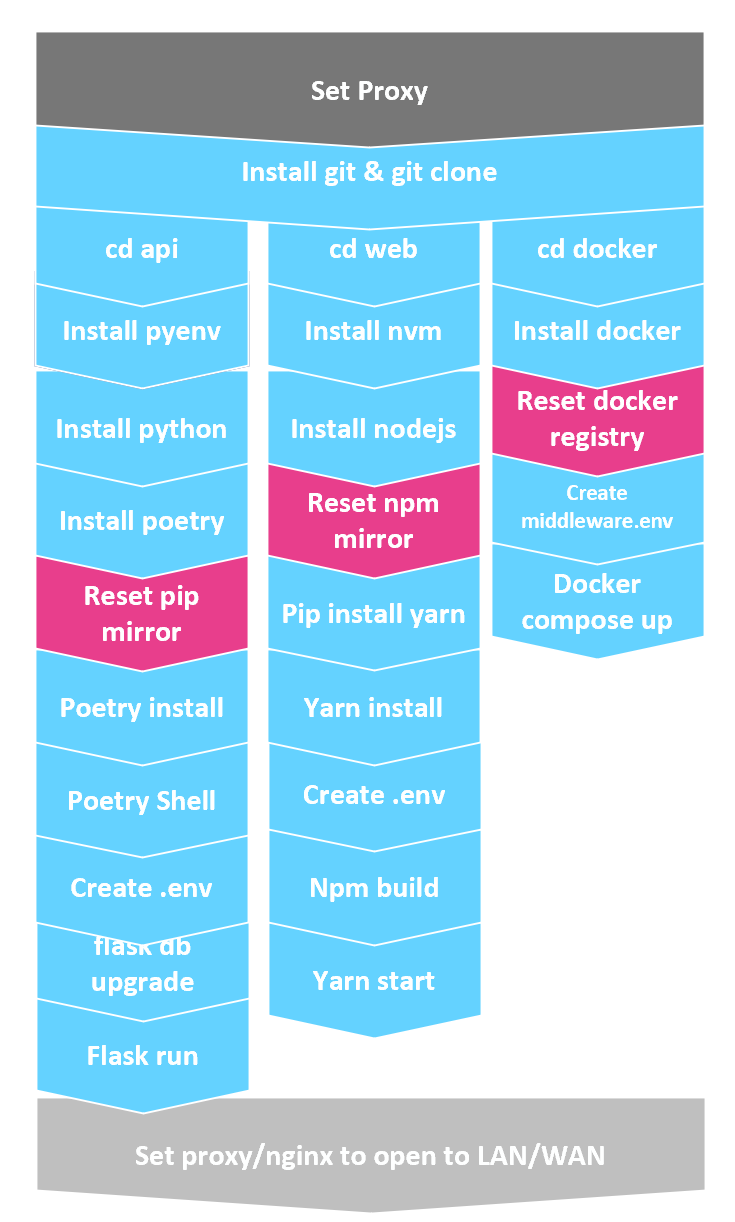
The first thing you need is to run git clone https://github.com/langgenius/dify.git , after entering Dify folder in your disk, there's 3 main workstream waiting for you:
- In
/apifolder, get your python environment ready, which will be used to run backend API and Celery(distributed task queue) - In
/webfolder, get your node environment ready, which will be used to run frontend UI. - In
/dockerfolder, get your docker compose ready, which will be running database and sandbox.
Moreover, you may suffer from network issue especially if you have limited web access, you may consider updating pip mirror , npm mirror and docker registry, and I will show you how in the 0x06 Troubleshooting
0x02 Get your python environment ready and run API
Move to /api folder.
Dify require a >3.10 version Python, and suggest using pyenv (a tool helps you install and switch Python with different versions) to set a 3.10 version Python.
Install pyenv:
curl https://pyenv.run | bashAfter completion, try
pyenvto verify if pyenv is installed, otherwise, add the$HOME/.pyenvtoPATHto make your OS readpyenvcommand by add following command in~/.bashrc(if you use bash, i.e. you use WSL) . For more info, visit https://github.com/pyenv/pyenv?tab=readme-ov-file#getting-pyenvecho 'export PYENV_ROOT="$HOME/.pyenv"' >> ~/.bashrc echo 'command -v pyenv >/dev/null || export PATH="$PYENV_ROOT/bin:$PATH"' >> ~/.bashrc echo 'eval "$(pyenv init -)"' >> ~/.bashrcNote: You can always use
exec "$SHELL"to refresh to let new command work.Install Python
Use pyenv to install python with certain version
pyenv install 3.10Activate your Python:
pyenv global 3.10You can try
pythoncommand to verify your Python.Install poetry
Run
curl -sSL https://install.python-poetry.org | python3 -Note:
Poetryshould be installed in a clean environment/machine.Install Dify backend requirments and celery
cd to your api folder:
cd apiinstall requirements (make sure Python 3.10 is activated)
poetry env use 3.10
poetry install
Notes: poetry will create a
venvin your Dify api folder, you need to activate it , just like originvenv:poetry shellBefore starting api, init the
.env:cp .env.example .envGet a key using
sed -i 's/SECRET_KEY=.*/SECRET_KEY=<your_value>/' .envand paste it intoSECRET_KEYvalue of your.envfile.And you can start
flaskandcelery, if you run Dify at first time, runflask db upgradeflask run --host 0.0.0.0 --port=5001 --debugIn another shell, run:
celery -A app.celery worker -P gevent -c 1 -Q dataset,generation,mail,ops_trace --loglevel INFO
0x03 Get your node environment ready and run Web
Move to /web folder.
Similar with python, we can use nvm to manage and install different node.js , to install nvm:
curl -o- https://raw.githubusercontent.com/nvm-sh/nvm/v0.39.7/install.sh | bash
Note: check the version number or just visit https://github.com/nvm-sh/nvm?tab=readme-ov-file#install--update-script
After installation, install Node.js and activate it:
nvm install 20
nvm use 20
You can use nvm list and nvm current to see what you have.
Then, jump to web, install yarn and requirements :
cd web
npm install -g yarn
yarn install
Note: yarn is a better choice compared with origin npm.
Then, compile the Dify website and serve it:
npm run build
yarn start
0x04 Get your docker environment ready and run middleware
Move to /docker folder.
If you are using windows, install Docker Desktop, and refer to https://docs.docker.com/engine/install/ubuntu/ to install docker.
In WSL, if you see docker deamon is not running , run:
sudo service docker start
Init the .env :
cp middleware.env.example middleware.env
Docker compose up:
docker compose -f docker-compose.middleware.yaml up -d
0x06 Troubleshooting
Network and Proxy
For node.js (npm), use:
npm config set registry https://mirrors.tuna.tsinghua.edu.cn/For poetry install, use:
export POETRY_PYPI_MIRROR_URL=https://mirrors.cloud.tencent.com/pypi/simple/For Docker, add file
/etc/*docker*/daemon.jsonwith:{ "registry-mirrors": [ "https://docker.riino.site" ] }For raw.githubusercontent.com connection issue , replace origin URL with raw.staticdn.net
Docker Connectivity
- If you cannot run sandbox and get connection error, clean up environment variable
HTTP_PROXYandHTTPS_PROXYinside your docker container.
- If you cannot run sandbox and get connection error, clean up environment variable
I lost my password
In your
/apifolder, withpoetry shellactivated, runflask reset-password. If you use all-in-docker mode, rundocker exec -it docker-api-1 flask reset-password.Note: this requires origin admin email, i.e. you MUST enter correct email to reset password.
I lost my email and password
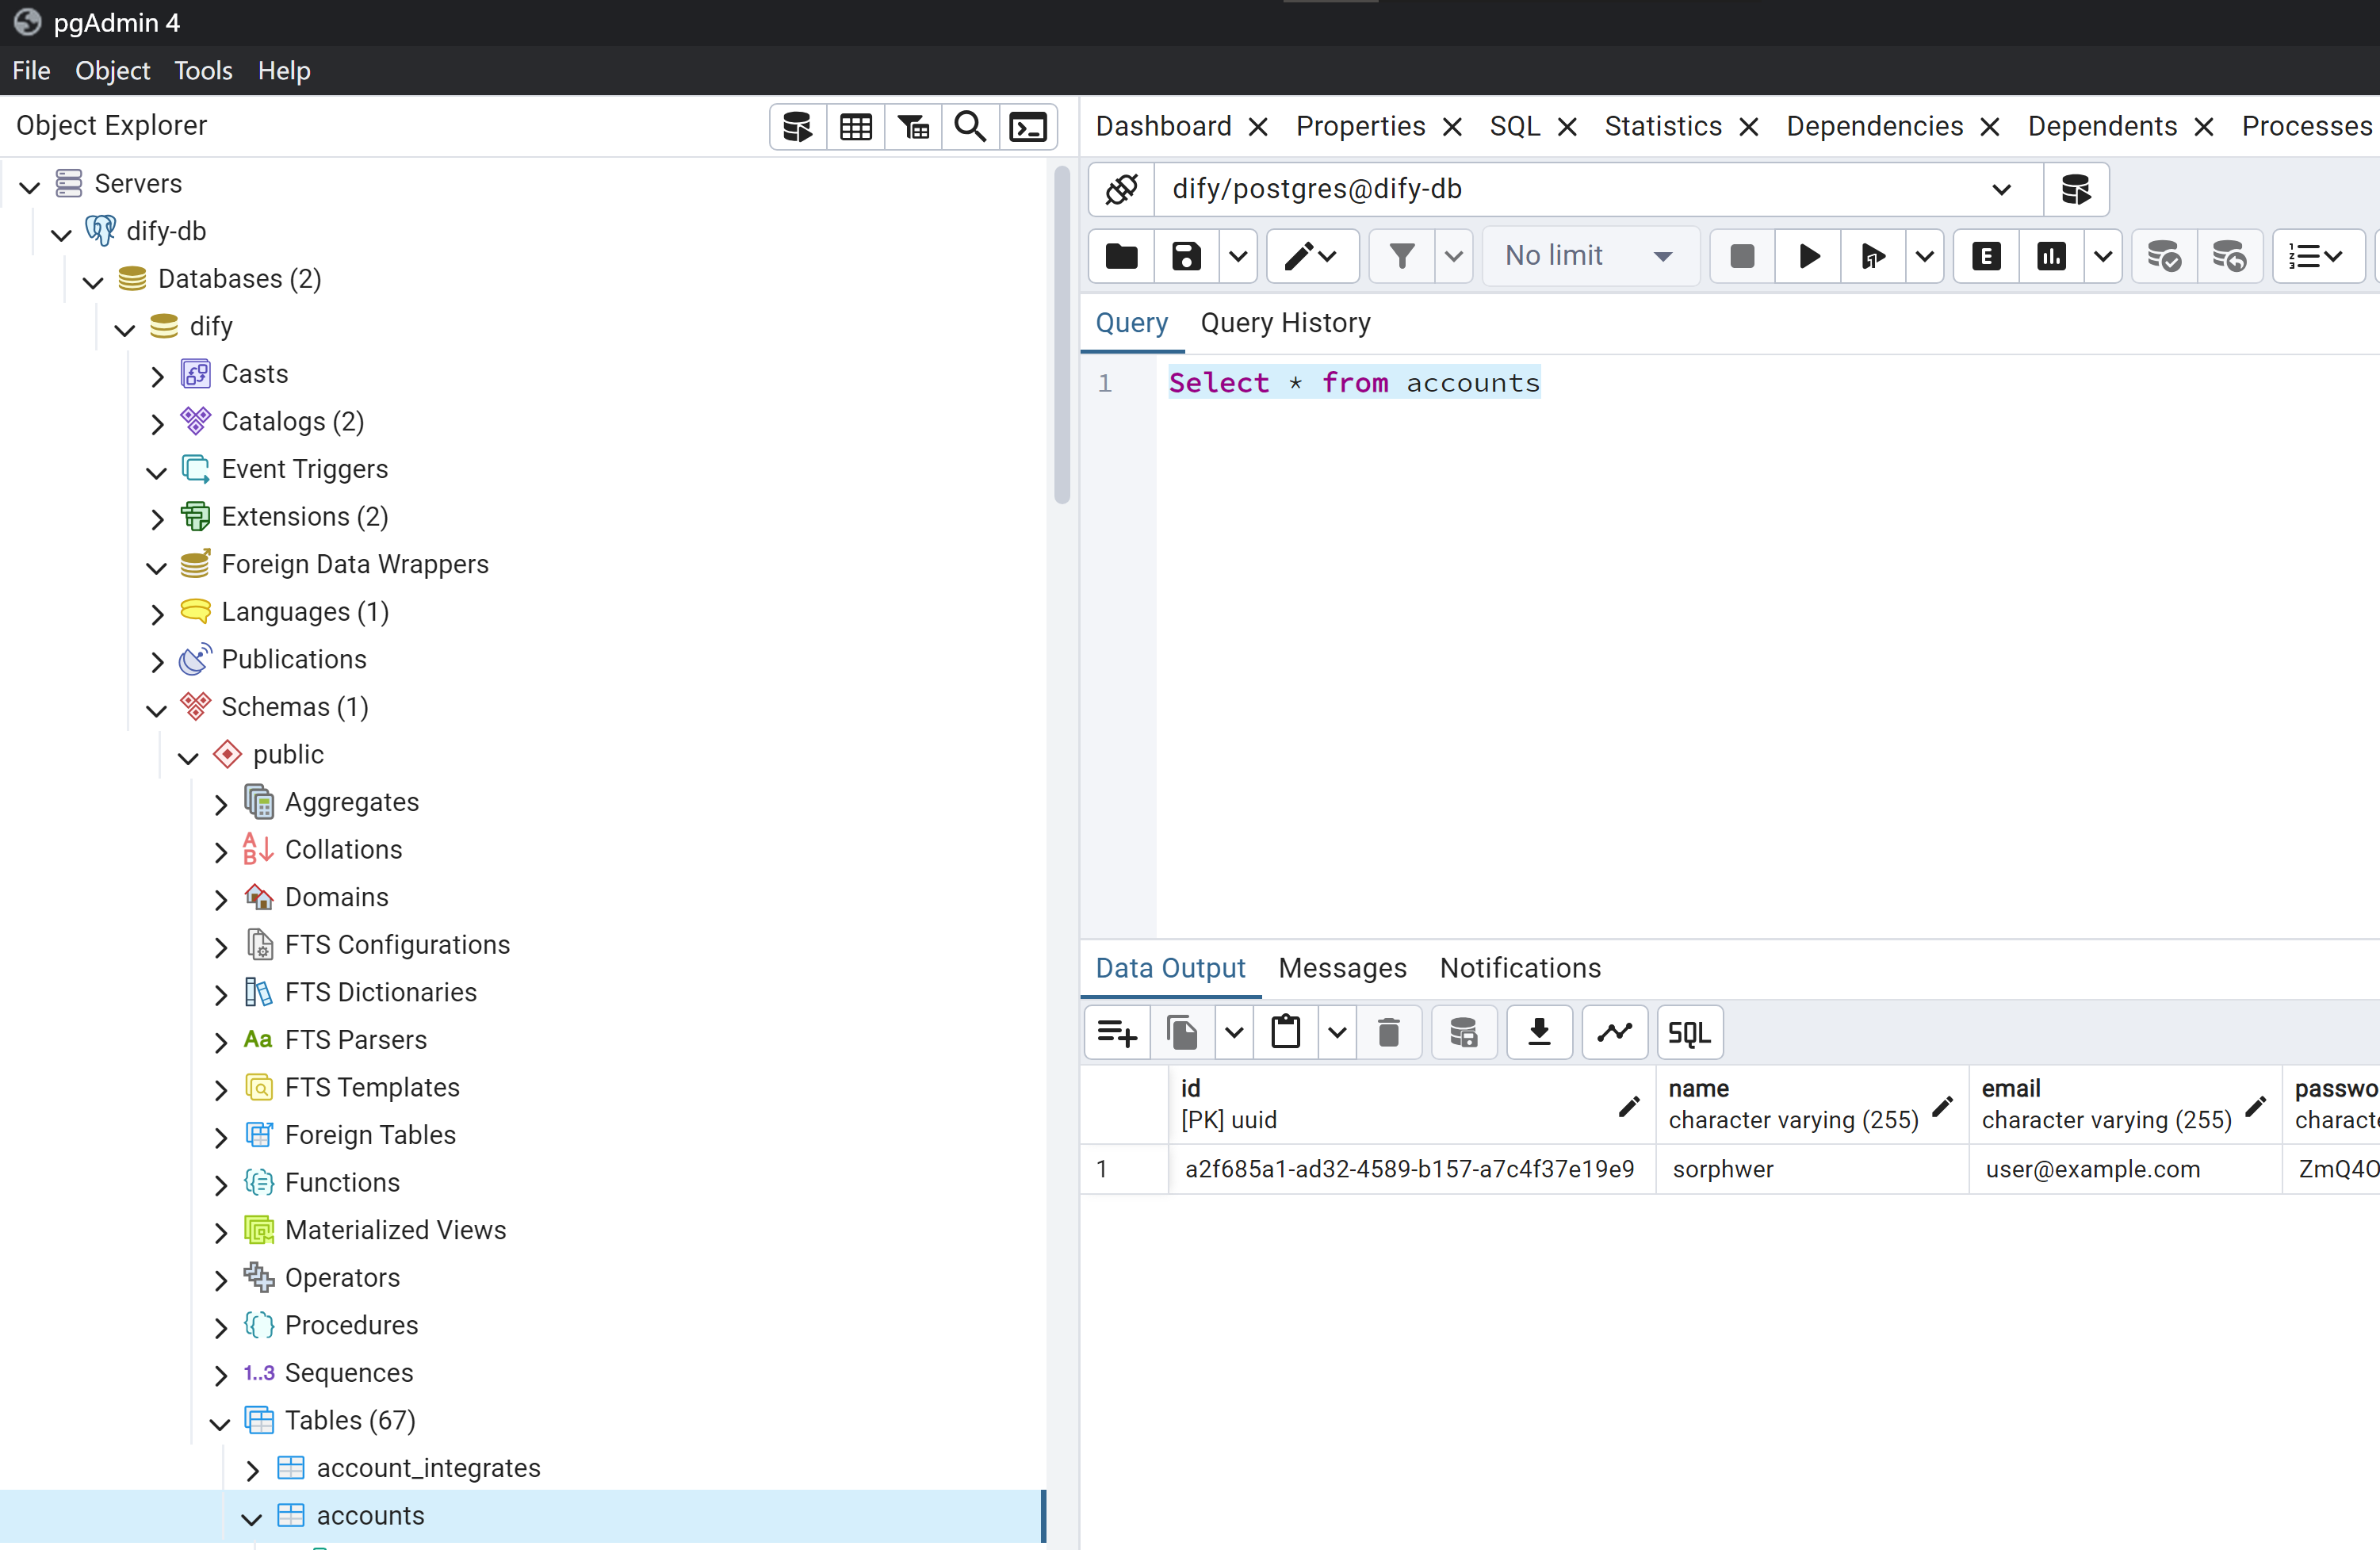
Start your Postgres database docker by running your all-in-docker compose or middleware docker compose.
Use any DBMS tools, for instance, Pgadmin, to connect to your Postgres, the default connection value is :
DB_USERNAME=postgres
DB_PASSWORD=difyai123456
DB_HOST=db
DB_PORT=5432
DB_DATABASE=dify
After connection, run query:
Select * from accounts
And you can review your email this way.
Open Dify in WSL to LAN or WAN
In Windows 10, you need to build fowarding by using: (run
netshin windows powershell)netsh interface portproxy add v4tov4 listenport=3000 listenaddress=0.0.0.0 connectport=3000 connectaddress=(WSL IP) netsh interface portproxy add v4tov4 listenport=5001 listenaddress=0.0.0.0 connectport=5001 connectaddress=(WSL IP)Note: Get WSL IP via
wsl.exe hostname -IThe result can be checked via
netsh interface portproxy show all: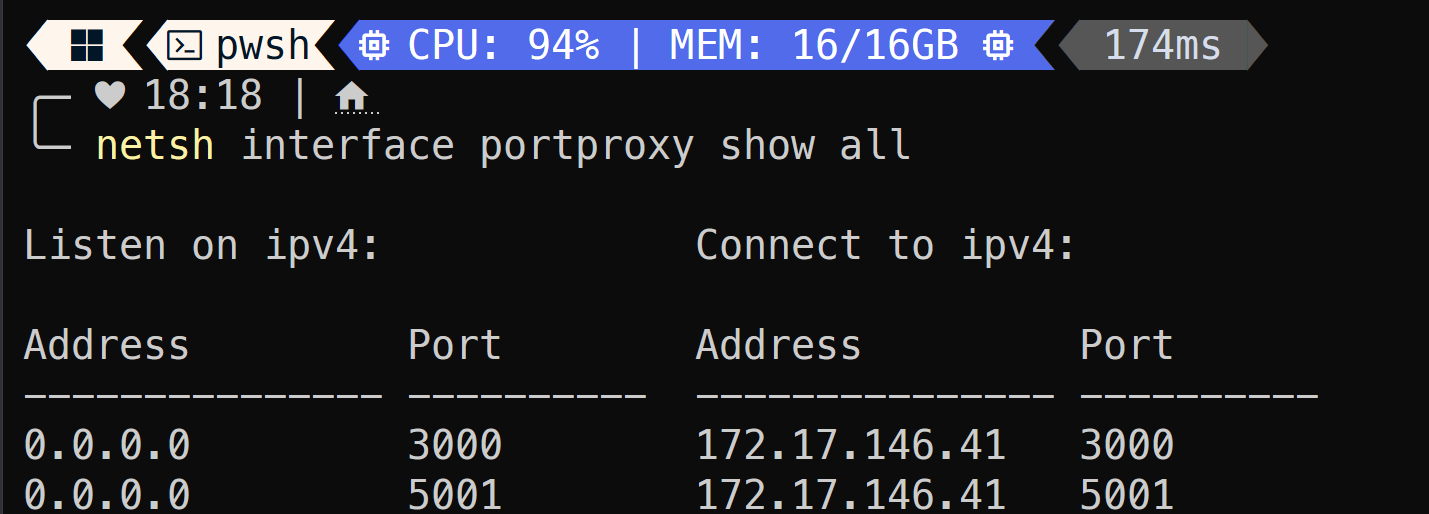
My Dify webpage keeps loading
You need to run
npm run buildandyarn startrather thannpm run dev, in the later situation the compiling continues when you visiting your Dify.